CallClerk - Settings E-Mail
The CallClerk - Settings - E-Mail window has several options that may be set, where appropriate click the check box or radio button beside the option to enable or disable the option. When a check or radio button is selected then that option is enabled otherwise that option is disabled.The options on this window are:
1. E-Mail From: the e-mail address from which the e-mail should appear to have come;
2. E-Mail Display Name: a user friendly display name for the From name on the e-mail;
3. E-Mail To: the e-mail recipient(s) that the e-mail should be sent to;
Notes:
A single e-mail recipient may, most simply, be identified by their e-mail address, for example:
person1@xyzcompany.com
Optionally a 'user friendly' name may be added in front of an e-mail address, for example:
John Doe person1@xyzcompany.com
Multiple recipients each separated by a comma (",") can be used, for example: John Doe person1@xyzcompany.com,Jane Doe person2@xyzcompany.com, Jim person3@abcdefg.com
Many companies providing cell phone and/or pager services offer you the ability to send an e-mail to a special e-mail account specific to your cell phone or pager in order that you may receive a text on your cell phone or a page on your numeric or alphanumeric pager. Ask your cell phone or pager provider if they provide this service, or search online for it ( it is often refered to as a sms gateway ). Here is a wikipedia article listing various examples in many countries. Please note, your provider may charge you extra for this service, its best to check with them first.
4. Priority: the priority associated with the e-mail;
5. Your e-mail server's authentication method;
Options include: Auto-Select, None, Logon, Plain, CRAM-MD5, and NTML
If you chose Auto-Select CallClerk will work to chose an appropriate method for you automatically
6. An option to Logon to your incoming mail server before sending mail (when this option is selected you must also identify your POP server's name in the POP server address);
7. The User ID associated with you Internet account. If you don't know this, contact your internet service provider;
8. Your User ID's password. Click the Change Password button to open the Change Password dialog box to change your password. Note changing your password in CallClerk will effect a password change for CallClerk only;
9. The POP and SMTP Server addresses (the POP address is only required if your server requires you to Logon to your incoming mail server before sending e-mails) - if you don't know these, contact your internet service provider; By default CallClerk will use port 25 when connecting to these servers. You can change the port that CallClerk uses on either
or both servers by simply adding a ":port number" without the quotes after the server name. For example, if your smtp server is called smtp.server.name and you want to connect on port 1234 you would use:
smtp.server.name:1234
10. Whether the POP and SMTP servers require the Secure Sockets Layer (SSL) protocol or not (most do not); also if the SMTP Server requires Transport Layer Security (TLS) or not. For example gmail uses TLS on port 587;
11. What to E-Mail, more specifically you can chose what to send in the subject line and the message body.
Options include:
for the subject line: date, time, name and number
for the body: labels, date, time, name, number, recorded message and/or faxes.
Notes:
a) Labels are words describing the information being e-mailed, for example the label in "Name: John Doe" is "Name:".
Omitting labels can help if you are sending the e-mail through a text messaging service to your cell phone, and your text message length is restricted.
b) Name and number each have two checked states:
- when checked the directory's display name/display number will be e-mailed
- when checked& grey an unformatted caller id name/unformatted caller id number will be e-mailed
c) Recorded messages and faxes can be zipped. Zipping a message will decrease its size and in some cases allow it to pass through e-mail filters.
d) If you select to send messages or faxes a confirmation line will also appear in the e-mail to confirm if a message/fax was sent or not; in the case that the answering machine is off an associated message will also appear.
12. Audio Format, sets the Audio Format for the message to be sent; for more information please see: Setting the Audio.Format.
13. E-mail saver options (E-mail only after ...).
E-mail saver options are designed to cut down on the number of e-mails CallClerk sends; this is handy for people who, for example, use the CallClerk e-mail function to send them a text message on their cellphone - but where their cell phone company charges them for each incoming text message.
13.1 From time to time, you may get a call from someone who only lets the phone ring once or twice and then hangs up.
If you don't want to get an e-mail for such calls you can set a threshold number of rings required for CallClerk to report a call to you via E-Mail.
By default the value in "Only send an E-Mail after this many rings" is set to zero. This means that, assuming the associated Send E-Mail option is set to ON in the CallClerk - Settings - Control panel, then an e-mail will be sent to you immediately after the Caller ID's information is know (except if the Answering Machine option
is set to ON and you have set CallClerk up to e-mail you answering machine messages, in which case CallClerk will wait for the message to be left, or if the incoming call is a fax and you have set CallClerk up to e-mail you faxes, in which case CallClerk will wait for the fax to be received).
Accordingly, excluding the above conditions, if you set the value for "Only send an E-Mail after this many rings" to 3, and the phone only rings twice then CallClerk will not send you an e-mail.
13.2 If you only want to be e-mailed for a particular caller only once if they call multiple times over a specific timeframe then you can just set the time limit. After that an e-mail will only be sent once regardless of the number of additional calls from the same number that are received in the specified time frame.
13.3 The option to "Only send an E-Mail if a message or fax was left" will tell CallClerk to do exactly that if checked.
Click the [Test] button to test sending an e-mail. If you have a firewall you may be prompted to allow CallClerk to access the internet. CallClerk only accesses the internet to send e-mails. CallClerk will only send e-mails to the address(es) you specify in the E-Mail setting window. Also, CallClerk will only send an e-mail when the [Test] button on the CallClerk - Settings - E-Mail window is clicked, or when an incoming phone call is received and you have selected 'Send an E-mail to report an incoming call' from the CallClerk - Settings - E-Mail window.
If you hold down the [Ctrl] key while you click the [Test] button, you will be prompted to delete any queued emails (if there are any).
If you hold down the [Alt] key while you click the [Test] button the test e-mail will be sent to the 'E-mail From' address instead of the 'E-Mail To' address.
Notes:
1. If an email can not be sent out because access to the smtp server is unavailable (for example because it is down, or internet access is unavailable) the email will be queued. The email will then be sent once the access to the smtp server is re-established (CallClerk will check every couple of minutes for this). Queued emails will be preserved even if you exit and restart CallClerk or reboot your machine. However, CallClerk does have to be running for the queued emails to be sent out.
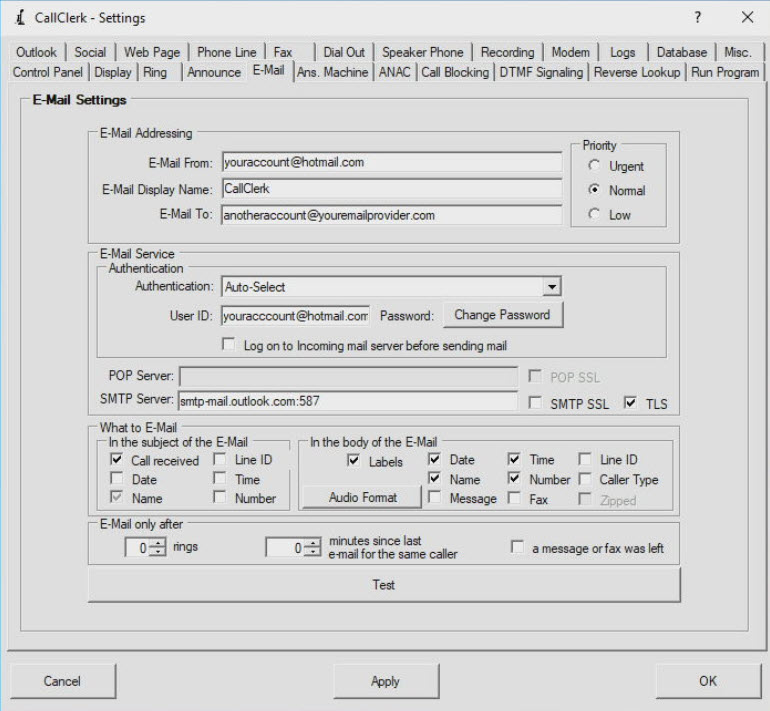
2. If you don't have an ISP email service that you can use you may want to consider setting up a free specific use account with another email provider, such as Microsoft's hotmail service. If you set up a hotmail account it can be configured within CallClerk as shown in the screenshot below.
Once the current settings have been modified the changes may be permanently applied by clicking on the [Apply] or [OK] button or voided by clicking on the [Cancel] button. If either the [OK] or [Cancel] button is pressed then the CallClerk - Settings window will be hidden.
The CallClerk - Settings - E-Mail window looks like this: