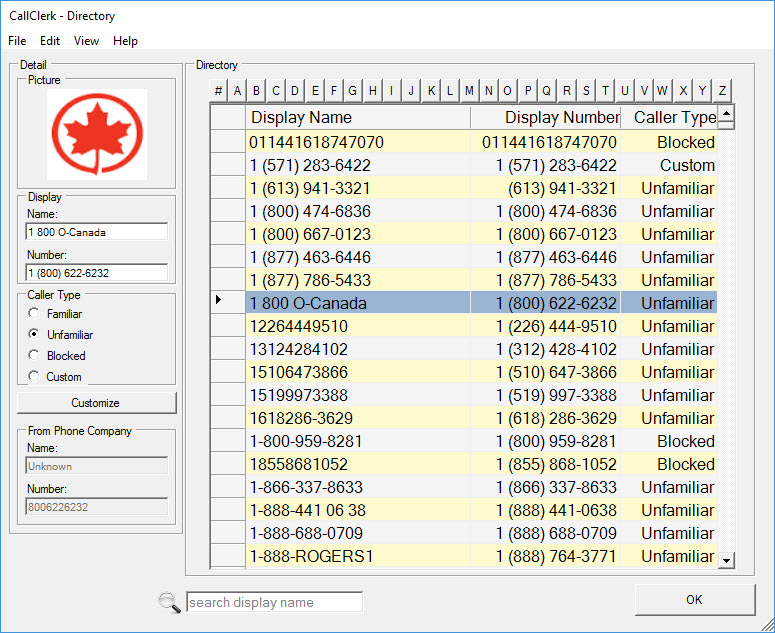
CallClerk - Directory Window
The CallClerk - Directory window provides a listing of all past callers. From this window you can: review the list of past callers, assign tailored display names and phone numbers, associate a picture to a particular caller and define the caller type of each caller. The directory entries can also be sorted, dialed, printed and/or deleted.A reverse number lookup can also be performed on a directory entry.
All directory records are displayed in the directory table of the CallClerk - Directory window.
CallClerk automatically creates a new directory record when a call is received for the first time from a new phone number.
A directory record may be manually created by selecting 'Edit - Add' from the CallClerk - Directory window’s menu bar.
The Display Name and Phone Number are those which appear in the CallClerk Display. When a new directory record is created the value in these fields are set to the same values as are reported by your local phone company, however, some automatic editing may be done to make these records appear more presentable.
Abbreviated and Full Directory Window
The Directory window has two formats: abbreviated and full.
To switch between abbreviated and full formats, click the View - More Detail option off the menu bar.
Assigning tailored display names and phone numbers
To assign tailored display names and phone numbers, select 'Edit - Edit' from the CallClerk - Directory window’s menu bar. An Add/Edit window will appear and you will be able to update the display name and display number fields associated with this caller. For example, you can change the name “SMITH JOHN” to “Mom and Dad”.
You can also edit the display name and phone number information, on the left hand side of the window, for the current entry. To change the current entry scroll to it in the directory list and click on it.
Setting the Caller Type Indicator
The Caller Type indicator identifies callers as being either Familiar, Unfamiliar, Blocked or Custom. This information, along with the settings on the CallClerk - Settings - Control Panel, is used to control how CallClerk process an incoming call. By default all new callers are set to Unfamiliar. The Customized option let's you tailor CallClerk specific actions for a particular directory; just click on the 'Customize' button and then change the caller type to 'Custom' to set your desired features for that particular caller.
To change the Caller Type for one or more directory entries.
To select a single directory entry to be updated, click on the grey box to the left of the directory record.
To select multiple directory entry in a series to be updated, click on the grey box to the left of the first entry in the series, hold the [Shift] key down and click on the grey box to the left of the last entry in the series;
To select various directory entry within the window hold the [Ctrl] key down and click on the grey box to the left of each directory record you want to update.
Once the directory entry/entries have been selected, change the Caller Type indicator to the desired value.
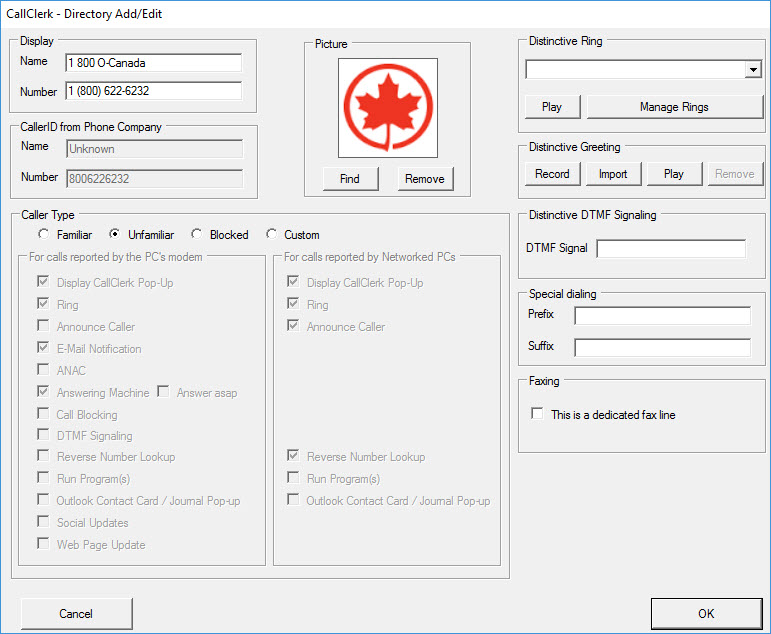
Customizing
Clicking the 'Customize' button on the CallClerk - Directory window opens up the CallClerk - Directory Add/Edit window.
From here you can set a variety of options as described below:
Setting the Picture to be associated with a Directory Entry
To set the picture for a Directory Entry, scroll to that entry in the directory list and click on it. Following this click on the [Change Picture] button and update the picture on the CallClerk - Directory Add/Edit window.
To update the picture on the CallClerk - Directory Add/Edit window, click [Set] on the CallClerk - Directory Add/Edit window to add a picture (you will be prompted to locate a picture file on your computer) or click [Remove] to remove an existing picture.
When a call is received from the associated caller the picture you have set will be displayed if the 'Include Picture' option is selected on the CallClerk - Settings - Display window.
Setting a Distinctive Ring
A distinctive ring can be set for a particular caller by clicking on the [Customize] button and then selecting a ring from the drop down list of available rings. Additional rings can be added through the [Manage Ring] button.
Setting a Distinctive Greeting
A distinctive message can be set for a particular caller by clicking on the [Customize] button and then clicking on the [Record] button. The recorded message will only be played for calls received from the number associated with the directory entry. Once recorded a message can be played by clicking the [Play] button or removed by pressing the [Remove] button.
You can also import a pre-recorded .wav file. To do this click on the [Import] button, find the file and click on OK. Please note the wav file must be in a particular format (shown below). CallClerk will attempt to convert whatever sound file you are importing into this format. If however it can not because it doesn't recognize the format, you should first save it in the following format:
audio format: PCM
audio sample rate: 8.000 kHz
audio sample size: 16 Bits
channels: 1 (Mono)
For versions of Windows Prior to and including Vista
Microsoft Windows' Sound Recorder program may be used change the properties of a wav file, to do this:
a) this Start Microsoft Windows' SoundRecorder
Start - Programs - Accessories - Entertainment - Sound Recorder
b) open a wav file - File - Open
c) select File - Save As
beside Format, click the [Change] button and select the options outlined above
d) give the file a name (it should end in with a .wav extension) and select OK
e) copy the file you created to the CallClerk music directory
For versions of Windows after Vista
Power Sound Editor Free is a great tool that can save your wav files in the needed format
DTMF signaling
As an alternative to an answering machine greeting you can have CallClerk emulate phone dial pad buttons being pressed on your phone. This may be used, for example, to open an apartment lobby door when you call from your cell phone.
DTMF signals you can use are the numbers 0 thru 9, the letters A thru D, star, and pound ( “0123456789ABCD*#” ).
As DMTF singnals are used in place of the greeting, CallClerk will hang up after they have been played - i.e. the caller will not be able to leave a message.
As it is likely you will be using this feature for a specific caller, you should likely set the Caller ID Type to Custom, and check both the 'Answering Machine' and 'Answer ASAP' options so that CallClerk will respond to the call as quickly as possible.
Custom Caller Type Functions
When the Caller Type is set to 'Custom' you can specifically turn on (checked) or off (unchecked) each of CallClerk's features for a particular caller. Just check/uncheck the options as you like.
When the Caller Type is 'Familiar', 'Unfamiliar', or 'Blocked' you can not change these options.
The option 'Answer asap' is only available for the 'Custom' Caller Type. When this option is checked CallClerk will start the answering machine following the ring that comes after the Caller ID information is received - this regardless of the number of rings that CallClerk normally waits for until it starts the answering machine.
Setting a Special Dialing Prefix and/or Suffix
You can set a special Dialing Prefix and/or Suffix for use when dialing a specific directory contact. For example for a prefix you can add your phone company's code for hiding your caller id info when you call someone, or for a suffix you can add the numbers needed to navigate a menu driven interactive voice response system (for example you can add the numbers associated with "Press '1' for English or '2' for French, and then Press '1' to get our hours of operation ... ".
In addition to the digits 0 through 9, many modems support the following special characters to control the dialing sequence:
a star "*" (without the quotes)
a hash "#" (without the quotes)
a comma "," (without the quotes) - for a Pause of usually 2 or 3 seconds,
a capital letter "W" (without the quotes) - to wait for a dial tone,
an "@" symbol (without the quotes) - to wait for silence, and
an explanation mark "!" (without the quotes) - to cause a hook flash.
Please note: when you add either a dialing prefix or a dialing suffix to a directory entry, the edit rules on the CallClerk - Settings - Dial Out Window will be ignored.
Setting the Fax Indicator
When the Fax indicator is checked calls from this caller will automatically answered and process as faxes
Searching:
By default all directory entries shown. To search for specific directory entries by directory name just type the name you are searching for in the search box at the bottom of the window. As you type the directory entries not matching your search criteria will be dynamically filtered out. To clear your search criteria click on the picture of the magnifying glass at the bottom of the window.
Advanced:
For example if you want all calls from a 1-800 number to be handled in the same way, here is how to set it up:
On the CallClerk - Directory window click on Edit - Add from the menu bar.
Enter the following:
Display Name: *
Display Number: 1800*
Caller ID Name: *
Caller ID Number: 1800*
You may also set any other option on the CallClerk - Directory - Add/Edit window that you like; for example if you want all calls blocked from 1-800 numbers then on the CallClerk - Directory - Add/Edit window select a caller type of blocked.
Of note: some phone companies always deliver the caller id with the leading 1, while others deliver the leading 1 either sometimes or never. Take a look at the 'From Phone Company' (Caller ID) Number on other existing CallClerk - Directory items to see if you need to put a leading 1 in or not. Do not add in any spaces, brackets, or hyphens in the prefix.
You can enter as many prefixes, as above, as you like. You can have your prefixes set up for as many digits (>1) as you like, for example: 1888* or 1555* or 1555729* (and/or 888* 555* 555729* as the case may be).
After you have done this the next time you get a call from a number matching your prefix rules (where CallClerk does not already have a directory entry defined for the full caller id number) CallClerk will create a new directory entry for you with all settings including caller type (Familiar/Unfamiliar/Blocked), Picture, Ring Name, Distinctive Greeting copied over from the template you created.
Setting up CallClerk to handle all calls from a specific caller id name in the same way regardless of their caller id number
For example if "ABC Inc" has several outgoing phone lines and you want all calls from "ABC Inc" to be handled in the same way, here is how to set this up:
On the CallClerk - Directory window click on Edit - Add from the menu bar
Enter the following:
Display Name: ABC Inc
Display Number: *
Caller ID Name: ABC INC
Caller ID Number: *
Also, you can set any other option on the CallClerk - Directory - Add/Edit window that you like; for example if you want all calls blocked from ABC Inc then on the CallClerk - Directory - Add/Edit window select a caller type of blocked.
After you have done this the next time you get a call from "ABC Company" where CallClerk does not already have a directory entry defined for that Caller ID number, CallClerk will create a new directory entry for you using the directory entry with the "*" in it as a template. All settings including caller type (Familiar/Unfamiliar/Blocked), Picture, Ring Name, Distinctive Greeting will be copied over from the template you created.
Click on View and any of 'Custom', 'Familiar', 'Unfamiliar' and 'Blocked' to toggle on or off viewing of history entries with those Caller Types.
Sorting
By default directory records are sorted based on the Display Name. To change the sort order, click on any one of the headings in the directory table and the directory records will be resorted based on criteria specific to that heading. Clicking on the same heading more than once changes the sort order from ascending to descending (and visa versa).
Dialing
The phone number associated with a directory record can be dialed by selecting the directory record (click on the grey box to the left of the directory record to do this) and then selecting File – Dial from the CallClerk - Directory window’s menu bar.
Printing
To print a report of all directory records, select 'File - Print' from the CallClerk - Directory window’s menu bar.
Updating Web Page
If you have made changes to your directory, for example changing a display name, you can manually update your web page by clicking on File - Update Web Page.
Note: this will be done for you automatically the next time a call is received if you have the update web page setting turned to on in the Control Panel.
Deleting
Directory records can be deleted by selecting the directory records to be deleted and then clicking on Edit – Delete from the Directory window menu bar.
To select a single directory record to be deleted, click on the grey box to the left of the directory record.
To select multiple directory records in a series to be deleted, click on the grey box to the left of the first record in the series, hold the [Shift] key down and click on the grey box to the left of the last record in the series;
To select various directory records within the window hold the [Ctrl] key down and click on the grey box to the left of each directory record you want to delete.
For each directory record to be deleted:
CallClerk will prompt you to confirm you want to delete the directory record, and
If there are history records associated with the directory record, CallClerk will prompt you to confirm that these should be deleted too.
CallClerk will only delete a directory record if there are no associated history records or you confirm that they may be deleted.
Note: CallClerk cannot restore a directory or history record once it has been deleted.
Microsoft© Outlook© Contact Card
Select View - Outlook Contact Card to view the Outlook contact card(s) associated with the selected directory entry.
Reverse Number Look up
Select View - Reverse Lookup to do a reverse lookup on a selected directory entry.
Opening the History window from the Directory window:
Select View – All History to open the CallClerk - History window from the CallClerk - Directory window.
Select View - History for the number of your caller to view the history of all calls from that particular number.
Select View - History for the name of your caller to view the history of all calls containing that display name.
Importing Directory entries
Select File - Import to chose from one of two types of imports:
1. From Google Contacts; this will start the CallClerk from Google Contacts Import Wizard which will copy information from your Google Contacts into the CallClerk directory. When the import is complete you will be able to identify these records as their Directory Phone numbers will be the formatted numbers but their CallerID numbers will be set to "Unknown". Later if you receive a call from someone who's Directory entry was imported CallClerk will automatically update the CallerID Number to be the CallerID number as supplied by your phone company.
2. From Outlook; this will start the CallClerk Import Wizard which will copy information from the Outlook Contact folders which you select into the CallClerk directory. When the import is complete you will be able to identify these records as their Directory Phone numbers will be the formatted but their CallerID numbers will be set to "Unknown". Later if you receive a call from someone who's Directory entry was imported from Outlook CallClerk will automatically update the CallerID Number to be the CallerID number as supplied by your phone company.
3. From a CSV File, this will start a directory import from a Comma Value Separated file. You will be prompted for the name of the CSV file to import as well as whether or not you want your CallClerk Directory entries to be overwritten if they are found in the import CSV file.
To see the needed format of the CSV import file simply do an export of your current directory entries.
If you are going to make your own import file, a really good and free tool for the job is Notepad++. Do not use Microsoft Excel, Excel has a way of updating the CSV file which makes it unusable by CallClerk.
You can also automatically import into the CallClerk Directory by copying a csv file called "import.csv" (without the quotes) to the same directory that your CallClerk Database is stored in.
To know where the callclerk.mdb file is found, just go to the CallClerk – Settings – Database window and look under where it says ‘Database Location’.
When importing via this method:
- entries that don't already exist in your CallClerk Directory will be added to your CallClerk directory,
- entries which already exist in your CallClerk Directory will not be overwritten,
- a record of the import process will be written to the CallClerk Session log, and
- once the import process completes the file “import.csv” will be deleted.
Exporting Directory entries
Select File - Export to export your CallClerk Directory entries into a CSV (Comma Value Separated) file. You will be prompted for a file name once you provide it CallClerk will immediately export all your CallClerk Directory entries to that file.
Setting the colours on the Directory window
Select File - Set Table Colours to change the colours on the Directory window. The colours you select for the directory window will also be used for the specialized directory entries on the Speed Dial window.
Setting the Font
Select File - Set Font - Auto to have CallClerk automatically set the font and font size to match your window.
Select File - Set Font - Fixed to set you own font and font size.
Double clicking in the selection area
If you double click on the selection area (the rectangular box to the left of the display name for an entry) the program will perform the action defined in the CallClerk - Settings - Misc window under where it says 'Double Clicking' and 'Directory entry'.
Closing the Directory window
To close the CallClerk - Directory window click the [OK] button or select File – Close from the CallClerk - Directory window’s menu bar.
Here is what the CallClerk - Directory window looks like: