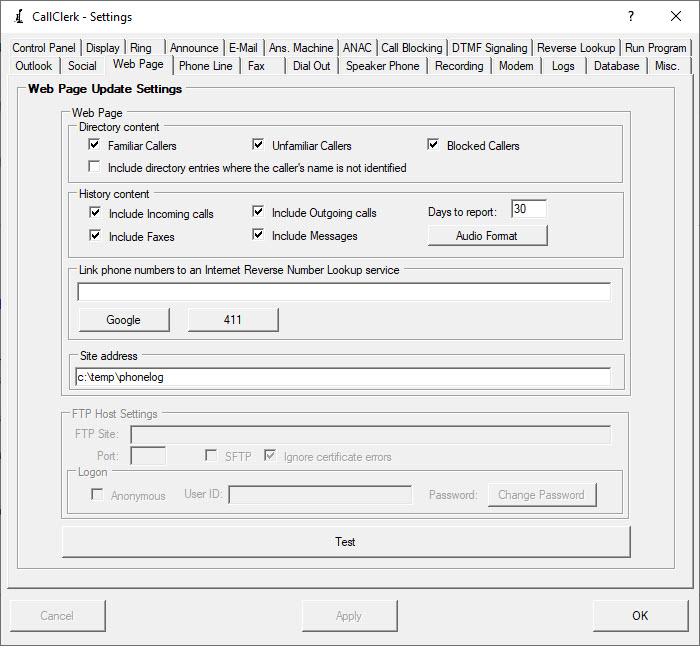
CallClerk - Settings Web Page Window
The CallClerk - Settings - Web Page window allows you to set up your preferences for uploading a web page, as well as optionally messages and faxes, each time a call is received or placed by CallClerk. These files can be uploaded to either an internal site hosted on your own network, or an external webpage hosted by a web hosting service.| If you decide to upload your messages and/or faxes you will be able to access them while online by double clicking on the associated icon on your web page. A screen shot of an example web page is included at the bottom of this document. Hosting on your computer or an internal network drive To host on an internal network, or even on you own computer, the drive and folder to which you would like to upload to needs to be identified in the CallClerk - Settings - Web Page window. You can either use a local drive and folder, such as c:\temp\phonelog , a networked drive and folder such as \\myhomenetwork\phonelog , or a network drive and folder mapped to a drive letter, for example R:\phonelog To identify the drive and file location you would like to use, simply enter it in the Site Address field as shown in the first screenshot at the bottom of the screen. Of note, if you enter a drive or network drive location in the Site Address filed, the FTP Host Settings fields in the CallClerk - Settings - Webpage window will be disabled. Hosting with Secure File Transfer Protocol (SFTP) or File Transfer Protocol (FTP) To make use of this function you will require a web site domain name and a hosting service that allows for either SFTP or FTP file transfer. Depending on your internet service provider you may or may not have this already. If you do not have these services you will need to get them in order to use this particular function of CallClerk. Domain name registration and Hosting services can be purchased separately from different providers or you can get them together as a package. These services do no come bundled with CallClerk. One provider that offers both Domain Name Registration and Hosting Services as bundled package is Bluehost. CallClerk has been hosted on Bluehost for several years. A word about Privacy (Password protecting your web page) Posting a list of your calls, messages and faxes on the internet may lead to privacy issues for some. Accordingly it is important to note that with some hosting services, such as Bluehost, you can add password protection to prevent your web page from being generally viewed by everyone. If you desire this level of protection you should check with your hosting provider to see if they offer it. Additionally, the web page that CallClerk builds for you by default has embedded in it an instruction to web site search engines robots telling them not to index the page. Accordingly even if you choose not to password protect access to your web page this feature will prevent most search engines from indexing your web page. As some web site search engines may ignore these instructions, its best to password protect your webpage for maximum privacy. |
Web Page content
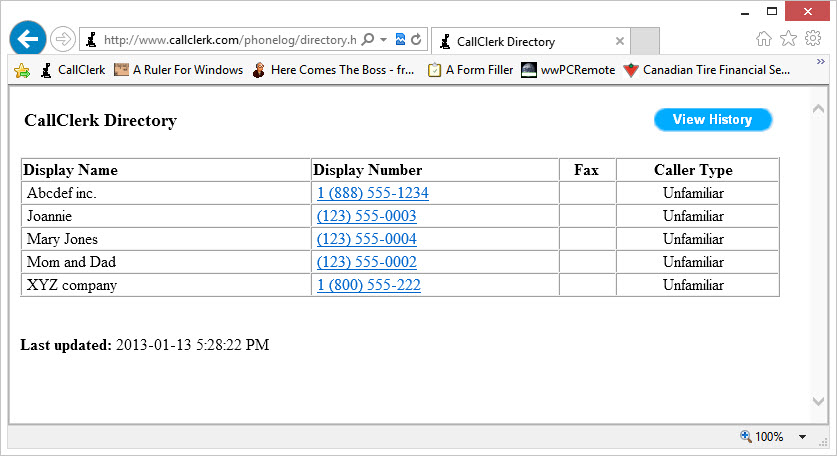
Directory:
You can have Familiar, Unfamiliar and/or Blocked directory entries uploaded to a Directory web page.
If you select the option to Include directory entries where the caller's name is not identified all Directory entries will be uploaded, otherwise only directory entries where their is a directory name will be uploaded to your web page.
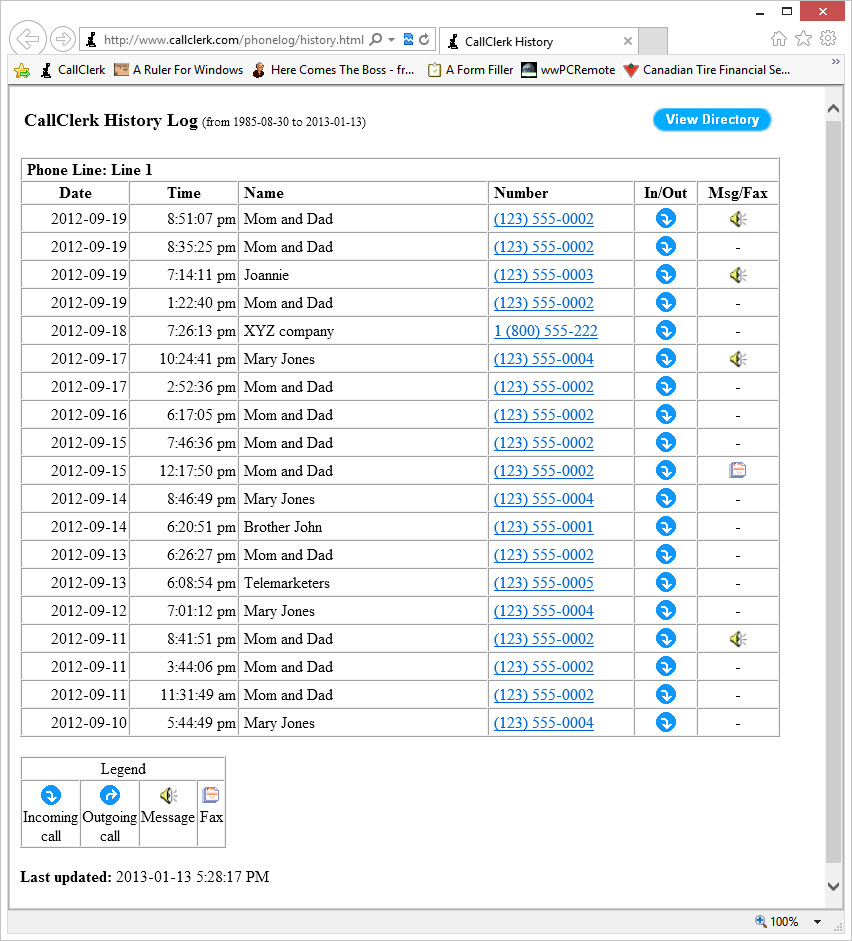
History:
Incoming and Outgoing Calls
The CallClerk - Settings - Web Page window allows you chose if you what only incoming calls, only outgoing calls or both incoming and outgoing calls listed on your web page.
Days to report:
Enter the number of days that you want, from the present, that you want to have reported on your web page. 1 day means just today,2 days means today and yesterday, and so on. 0 days means all days in your history log.
Incoming and Outgoing Calls:
The CallClerk - Settings - Web Page window allows you chose if you what only incoming calls, only outgoing calls or both incoming and outgoing calls listed on your web page.
Messages and Faxes:
Where there is an associated message/recording or fax with a call, you can chose if you what these uploaded or not.
If you choose to upload your messages or faxes then CallClerk will only upload them if they are not already on your web server.
Uploaded messages can be placed on your server in a variety of formats. When CallClerk records a message it uses the highest quality possible, this however results in a large file.
You can click the Auto Format button to set an audio format which will result in a smaller file size for file upload. Many, if not all, the smaller file sizes offer sound quality that can be quite acceptable to some. The advantage of using a smaller file size are that the upload and playing processes go much faster, you bandwidth is saved, and CallClerk may be able to reset itself to accept the next incoming call faster.
Link to an internet reverse lookup service:
The phone number displayed by CallClerk on your web page can optionally include a hyper link to a web page look up service.
Click the 'Google Number' or '411 Number' to you these services, or use your own - you can use substitutions similar to those describe for CallClerk's reverse number lookup function.
You can also use all the advanced formatting options as shown via the Advanced button on the CallClerk - Settings - RunProgram window
Leave this field blank if you do not want to link to an internet reverse number lookup.
Days to report:
Enter the number of days that you want, from the present, that you want to have reported on your web page. 1 day means just today,2 days means today and yesterday, and so on. 0 days means all days in your history log.
Site address:
As explained above, this can either be a location on you computer, your network, or on a website. Enter your web page folder address for the site, for example one of:
c:\temp\phonelog
\\myhomenetwork\phonelog
https://www.example.com/phonelog
Notes:
1: computer addresses use a slash like this "\", while web page addresses use a slash like this "/".
2. if your web site is being hosted by a web site hosting company, such as Bluehost, the web site address should begin with either http:// or https://
3: When you click the test button your directory and history web pages will be uploaded and CallClerk will open the history.html page at the site that specified in the Site address field on the CallClerk - Settings - Web page window.
S/FTP (Secure/File Transfer Protocol) Settings
FTP Site:
Note it is strongly recommended that you create a directory, such as 'phonelog', on your website to hold only the CallClerk upload information. This will help ensure privacy, and that your directories are kept organized.
Please note, and this is the tricky part, depending on your S/FTP userid set-up, your s/ftp connection will automatically connect to a specific directory. So for example, the connection could potentially start in a directory such as: /home directory, /home/public_html, or /home/public_html/phonelog depending on how the S/FTP user id is set-up. Accordingly, the FTP Site field on the CallClerk - Settings - Web page window needs to contain the site name followed by any additional directories needed to reach the directory. Accordingly, the full name of your ftp site including directories is needed. For example:
ftp.example.com
ftp.example.com/public_html/phonelog
If you have a local or network drive entered in the FTP site, the FTP settings below will be disabled. To enable the FTP settings just enter your FTP site address in the FTP site field.
Log on info:
Click Anonymous or include your user id and password as required by your hosting provider.
Note some hosting providers identified a user name such as user1 while others use user1@example.com
FTP connection type and Port options:
CallClerk will use SFTP if the SFTP option is checked, otherwise it will use FTP.
The port for FTP will almost always be 21, and the port for SFTP will almost always be 22. If these combinations are not used, CallClerk will highlight the Port field in yellow. CallClerk will use whatever port is specified, even if it is highlighted in yellow.
Ignore certification errors
The ignore certification errors option only applies when SFTP is checked, if SFTP is not checked this option will be disabled.
Normal if you are using SFTP then if certifications errors are found, uploading should not continue. Accordingly, if certifications errors are found and the Ignore certification errors option is unchecked no uploads will occur. However, if you want CallClerk to continue with the upload process regardless of if certifications errors are found or not, then the Ignore certification errors option should be checked.
Deleting files:
CallClerk will only upload files to your computer, internal network or S/FTP server, it will not remove them.
You can however use File Explorer to delete them from your computer or internal network, or a free program called FileZilla to remove them from your ftp server.
Of note, if a file already exists on your site, such as an old phone massage, which would otherwise need to be uploaded when CallClerk is refreshing a page, CallClerk will not upload it again. This only exception are the history.html and directory.html files which are refreshed when a web update is done.
Once the current settings have been modified the changes may be permanently applied by clicking on the [Apply] or [OK] button or voided by clicking on the [Cancel] button. If either the [OK] or [Cancel] button is pressed then the CallClerk – Settings window will be hidden.
The CallClerk - Settings - Web Page window looks like this this:
Here is an example of the Directory and History web pages created by CallClerk: