CallClerk - Settings Misc. Window
The CallClerk - Settings – Misc. is used to set various miscellaneous CallClerk settings.Click the check box beside an option to enable or disable that option. When a check appears in the check box then the option is enabled, when no check appears the option is disabled.
For start-up there are two options that may be set, these are:
1. Start CallClerk when you logon; when checked a shortcut to CallClerk will be put in your Windows Startup folder, this will cause CallClerk to be started each time your log on to your computer.
When the check mark is removed from the check box the shortcut to CallClerk will be removed from your Startup folder.
2. Show a Splash Window when CallClerk starts; when checked a splash screen will appear when CallClerk is started, when not check the splash screen will not appear.
1. Confirm Shut Down when exiting – if this option is checked CallClerk will confirm shut down when exiting.
Other misc. settings allow you to:
1. Choose the window you would like to open up when you double click on the CallClerk Systray Icon. Select the window you want to open up from the drop down box.
2. Show a white background under the CallClerk icon in your systray.
3. Set Hot Keys. Hot Keys will allow you to open up the CallClerk Dial, Directory, History, and/or Settings windows when they are pressed, regardless of what application you are currently using. You can also set a Hot Key to open up the CallClerk Dial window and load into it the contents of your clipboard.
Hot Keys values are defined by you. Just type the combination of keys into the text box associate with each system wide Hot Key option.
Key values are surrounded by square brackets, for example: [CTRL], [ALT], [F3], [A]
Key values you can use are:
| Letters | [A] .. [Z] | |
| Numbers | [Keyboard0] ... [Keyboard9], [NumberPad0] ... [NumberPad9] | |
| Function Keys | [F1] ... [F12] | |
| Special Keys | [HOME] [END] [ESC] [INSERT] [BACKSPACE] [PRTSCN] [DELETE] [PAGEUP] [PAGEDOWN] [ARROWUP] [ARROWDOWN] [ARROWLEFT] [ARROWRIGHT] [\] [|] [,] [<] [.] [>] [:] [;] ["] ['] [-] [_] [=] [+] [?] [/] ['] [~] |
|
| Modifiers you can use are: | [CTRL] - the control key [ALT] - the alt key [WIN] - the windows key [SHIFT] - the shift key |
Keys values must be used in combination with one or more modifiers, for example:
[CTRL] [H]
[CTRL] [ALT] [H]
Only the functions keys do not require a modifier (but can have a modifier if desired), for example:
[F10]
[ALT] [F10]
You can only use one Key Value, for example:
[ALT] [J] is ok
[ALT] [J] [H] is not ok
When you are typing in the key values they will appear in red until you have entered a valid combination, after which time they will appear in black. For example:
[CTRL] [F
[CTRL] [F10]
4. Boost CallClerk's Priority as needed CallClerk's priority will be upgrade as needed from time to time - on some machines this will allow you to see the Display Screen and Microsoft© Outlook© info sooner (note: this option is only available on PCs with multi-core processors);
5. Start Outlook before loading contacts (this is generally not needed, however if Outlook uses add-ins or if you are prompted by Outlook to choose a default profile selecting this option may help if CallClerk is being held up by an Outlook prompt when it is started). Please note, to check this option Outlook must already be running.
6. Automatically format the display number; this option is set on by default, it will format the caller id number into a display number such as 5551234567 into (555) 123-4567. CallClerk uses the Windows Regional Settings Location to determine the display format to be used. By default it is set to the format used in Canada and the US, however the formats from other countries such as the UK, Italy, Brazil and Israel are also supported. Unchecking this option simply puts the unformatted caller id number, as supplied by your phone company, in the display field.
7. Set special actions to be taken when you click on the picture on the CallClerk - Pop-up Display, or Double Click on a History entry, Directory entry or the CallClerk Systray Icon;
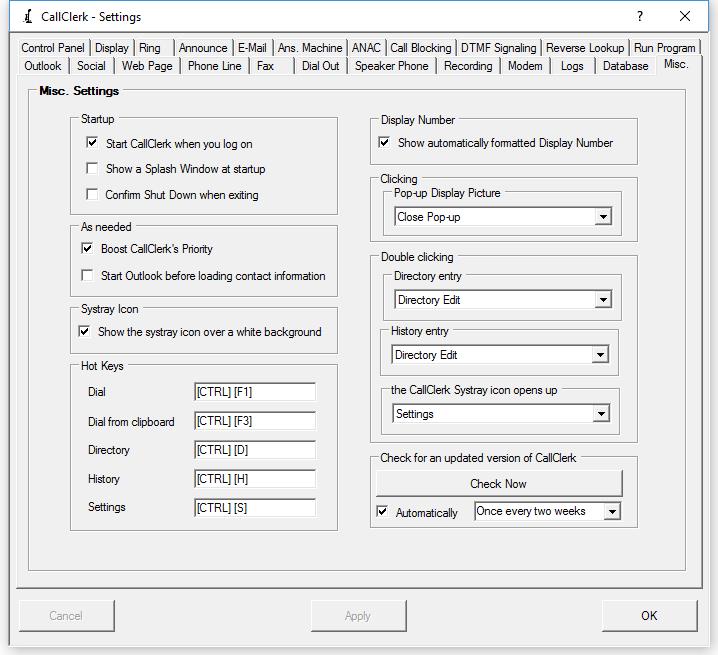
8. Have CallClerk automatically check that it's version is up to date. You can also click the [Check Now] button to have this check run immediately.
Here is what the CallClerk - Settings – Misc. window looks like: