CallClerk - History Window
The CallClerk - History window provides a listing of received calls; from this window you can review all history records on file and, if you like, sort, dial, print or delete them.You can also use this window to play the messages recorded on calls.
A reverse number lookup can also be performed on any history entry.
All history records are displayed in the CallClerk - History window. Abbreviated and Full History Windows
The History window has two formats: abbreviated and full.
To switch between abbreviated and full formats, click the View - More Detail option off the menu bar.
Viewing Incoming and Outgoing Calls
Click on View - Incoming Calls and/or View Outgoing Calls to select which types of calls you would like to see in the CallClerk - History Window; by default both types are shown.
Please note: With respect to placed calls, Clerk can only log calls that are placed via the CallClerk Dial Pad; it will not record calls place by, for example, an extension phone.
Sorting
By default history records are sorted based on the date and time they were recorded. To change the sort order of the history records click on any one of the headings in the Call History table and the history records will be resorted based on criteria specific to that heading. Clicking on the same heading more than once changes the sort order from ascending to descending (and visa versa).
Filtering
Click on View and 'Incoming Calls', 'Outgoing Calls', or 'Unreviewed Messages / Faxes' to filter the viewing of history entries.
Searching
By default history entries shown. To search for specific history entries by directory name just type the name you are searching for in the search box at the bottom of the window. As you type the history entries not matching your search criteria will be dynamically filtered out. To clear your search criteria click on the picture of the magnifying glass at the bottom of the window.
Dialing
The phone number associated with a history record can be dialed by selecting the history record (click on the grey box to the left of the history record to do this) and then selecting File – Dial from the CallClerk - History window’s menu bar.
Printing
To print a report of all history records, select 'File - Print' from the CallClerk - History window’s menu bar.
Updating Web Page
If you have made changes to your history log, for example if you have deleted a message or call, you can manually update your web page by clicking on File - Update Web Page.
Note: this will be done for you automatically the next time a call is received if you have the update web page setting turned to on in the Control Panel.
Link to Directory
From time to time your modem may report an unknown caller to CallClerk even thought the caller id information shows up on a caller id box attached to the same line. In these cases CallClerk allows you to 'touch up' the History entry by associating a caller (already listed in your Directory) with the call.
When the caller id number is unknown, select the History entry and click the 'Edit' - 'Link to Directory' menu commands to touch it up. When you do this CallClerk will open up the CallClerk - Directory - simply double click on the Directory entry you want to associate the call with and CallClerk will do the rest (following a confirmation prompt).
If the caller info is not unknown you can still touch it up, however you will have to press the ALT key as you select the History entry in order to do so.
Deleting
History records can be deleted by selecting the history record(s) to be deleted and then clicking on Edit – Delete from the CallClerk - History window’s menu bar.
To select a single history record to be deleted, click on the grey box to the left of the history record;
To select multiple history records in a series to be deleted, click on the grey box to the left of the first record in the series, hold the [Shift] key down and click on the grey box to the left of the last record in the series;
To select various records within the window hold the [Ctrl] key down and click on the grey box to the left of each history record you want to delete.
Note: CallClerk cannot restore a history record once it has been deleted.
Working with Faxes
The Faxes option on the Menu Bar will be available any time a history entry containing a fax is highlighted. From the Faxes option on the Menu Bar you will be able to:
View a Fax
Select this option to open the Fax Viewer.
Mark Faxes Reviewed / Not Reviewed
When a fax is viewed or forwarded CallClerk will mark it as 'Reviewed'.
Select Fax - Mark as Reviewed / Not Reviewed to change the Reviewed / Not Reviewed indicators on the fax(es) you select.
(see 'Deleting' above to find out how to select multiple messages or faxes)
Forward a Fax via E-Mail
To quickly e-mail a Fax click this option. The Forward via E-Mail window will then appear.
Forward a Fax via Fax
To quickly Fax out a Fax you have received click this option. The Forward via Fax window will then appear.
Save a Fax to Disk
Faxes are stored within CallClerk's Database. To save a selected Fax to a separate disk file select Save Fax to Disk.
Delete a Fax
Select Fax - Delete to delete a Fax from the CallClerk Database.
Note: when a Fax is deleted in this way the history entry still remains.
To delete the whole history record, Fax and all, see the section entitled Deleting above.
Note: CallClerk cannot restore a Fax once it has been deleted.
Working with Messages
The Messages option on the Menu Bar will be available any time a history entry containing a message is highlighted. From the Message option on the Menu Bar you will be able to:
Play Messages
Select Message - 'Play' to begin playing the message associated with the current record. If multiple messages are selected (see Deleting Messages above to find out how to select multiple messages) all selected messages will be played.
Select Message - 'Stop Playing' while a message is playing to stop playing the message.
Select Message - 'Play using Default Player' plays the message using your default sound file player (usually allowing you to start, stop, restart, forward, rewind etc. you message in the way you are most familiar with)
Mark Messages Reviewed / Not Reviewed
When a message is played CallClerk will mark it as 'Reviewed'.
Select Message - Mark as Reviewed / Not Reviewed to change the Reviewed / Not Reviewed indicators on the message(s) you select.
(see 'Deleting' above to find out how to select multiple messages or faxes)
Forward a Message via E-Mail
To quickly e-mail a recorded message click this option. The Forward via E-Mail window will then appear.
Save a Message to Disk
Messages are stored within CallClerk's Database. To save a selected message to a separate disk file select Save Message to Disk. Please note the audio format in which the message will be saved is set on the CallClerk - Settings - Database window.
Delete a Message
Select Message - Delete to delete a message from the CallClerk Database.
Note: when a message is deleted in this way the history entry still remains.
To delete the whole history record, message and all, see the section entitled Deleting above.
Note: CallClerk cannot restore a message once it has been deleted.
Microsoft@ Outlook@ Contact Card
Select View - Outlook Contact Card to view the Outlook contact card(s) associated with the selected history entry.
Reverse Number Look up
Select View - Reverse Lookup to do a reverse lookup on a selected history entry.
Opening the Directory window from the History window:
Select View – Directory to open the CallClerk Directory window from the CallClerk - History window.
Exporting History entries
Select File - Export and either 'Abridged' or 'Complete' to export your CallClerk History entries into a CSV (Comma Value Separated) file. You will be prompted for a file name once you provide it CallClerk will immediately export all your CallClerk History entries to that file.
An Abridge export will detail only core History data, while a Complete export will yield a complete exported record associated with each call.
Setting the colours on the History window
Select File - Set Table Colours to change the colours on the History
window.
Setting the Font
Select File - Set Font - Auto to have CallClerk automatically set the font and font size to match your window.
Select File - Set Font - Fixed to set you own font and font size.
Seeing More Data
Click the [More] Button to see the line number associated with the History Record; this number can be different when multiple versions of CallClerk are monitoring multiple phone lines but sharing a common database. Click the [Less] button to hide the line number on the History window.
Double clicking in the selection area
If you double click on the selection area (the rectangular box to the left of the date for an entry) the program will perform the action defined in the CallClerk - Settings - Misc window under where it says 'Double Clicking' and 'History entry'.
Closing the History window
To close the CallClerk - History window click the [OK] button or select File – Close from the CallClerk - History window’s menu bar.
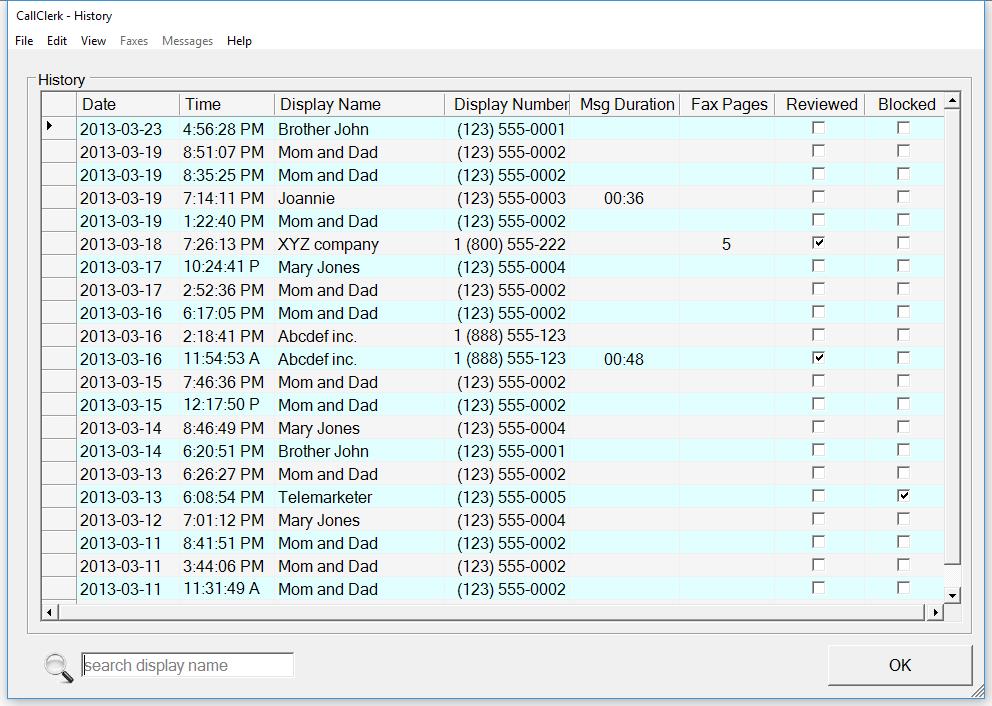
The CallClerk - History window looks like this: