CallClerk - Dial Out and Speed Dial Windows
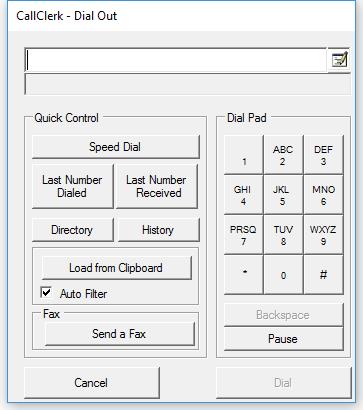
The CallClerk - Dial Out window is used to answer incoming calls (requires a TAPI modem) and place outgoing calls. To answer an incoming call click on 'Answer' on the CallClerk Display window. To place outgoing calls it can be accessed from the Main window, Directory window, History window and CallClerk Systray icon.To use Dial Out – the ‘Allow Dial Out’ option must be enabled in the Settings– Dial Out window and either the 'Use TAPI' or 'Use modem directly' options must be selected in the Settings Modem window.
The CallClerk Dial Out window allows you dial from the:
speed dial list
last number dialed (redial)
last number received
Directory window
History window
a phone number stored in the your PC's clipboard
the Dial Pad/keyboard.
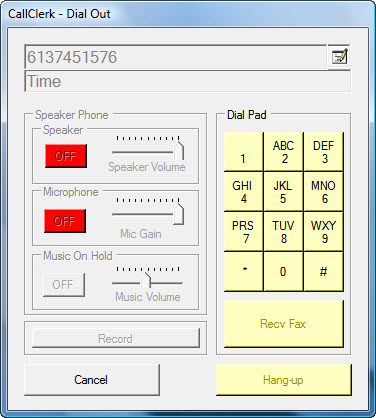
When a call is connected the CallClerk Dial Out window will change to include options for:
a speaker phone
music on hold
recording a conversation
Additionally you can use this window to send a fax.
Note each of these options will only appear if you have a TAPI modem and you are using it in TAPI mode. Also for the speaker phone options you require a TAPI modem with speaker phone capabilities.
Dial Out Edit Rules
This window also allows you to toggle on and off the Dial Out Edit rules set in the Settings– Dial Outwindow.
When the Dial Out Edit Rules are on you will see this symbol beside the dial out display area:
With Dial Out Edit Rules on CallClerk will:
-Replace key pad letters with numbers, for example 555-Help is translated to 555-4357
- As appropriate, add the number you identified in the CallClerk - Settings- DialOut window to proceed long distance calls
When the Dial Out Edit Rules are off you will see this symbol beside the dial out display area:
Speed Dial
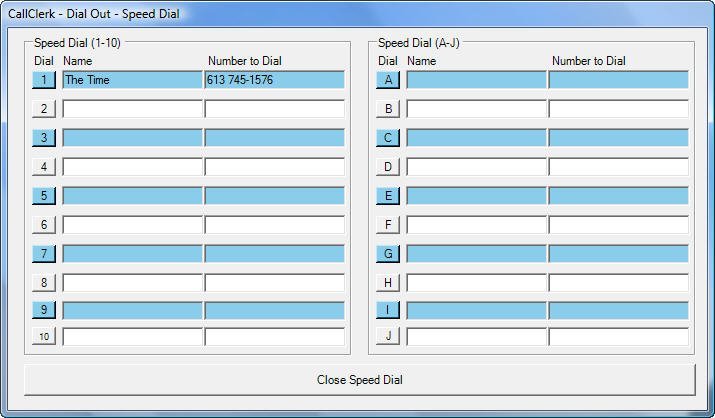
Click on the [Speed Dial] button and the CallClerk - Dial Out - Speed Dial list will appear (see illustration below).
You may add up to twenty entries in the Speed Dial List.
Each entry on the Speed Dial List buttons, may contain a 'name' and phone 'number'. The 'name' is optional and describes the phone 'number'.
Entries may be entered by keying them into the fields on the screen.
Entries may also be loaded from the Directory.
Clicking on a Speed Dial List button when its associated name and number fields are blank will cause the CallClerk- Directory window to appear, select a directory entry and then 'OK' to load the name and numbers found in the directory into the associated Speed Dial button fields.
Clicking on a Speed Dial List button when its associated number contains a value will causes CallClerk to dial the speed dial number immediately. You can also press the Alt key and the Number/Letter of the speedial button to start the speed dial process. For button 10 you can press [Alt][0].
NNote: Speed Dial numbers are dialed just as they are displayed in the CallClerk - Dial Out - Speed Dial window. Edit Dialing Rules are NOT applied to Speed Dial Numbers.
Last Number Dialed (redial)
If since the last time you have started CallClerk you have dialed a phone number using the CallClerk Dial Out window, the [Last Number Dialed] button will be enabled.
Click on the [Last Number Dialed] button and the last number dialed will be loaded into the Dial Out Display area.
CClick on the [Dial] to begin the dialing sequence (see more information below).
Last Number Received
If their are history entries in your CallClerk History Log the [Last Number Received] button will be enabled.
Click on the [Last Number Received] button and the phone number most recently stored and maintained in the History Log will be loaded into the Dial Out Display area.
Click on the [Dial] to begin the dialing sequence (see more information below).
Directory Window
Click on the [Directory] button and the Directory window will appear. Select an entry to dial in the Directory window and click [OK]. The entry you selected will be copied to the Dial Out Display area.
Click on the [Dial] to begin the dialing sequence (see more information below).
History Window
Click on the [History] button and the History window will appear. Select an entry to dial in the History window and click [OK]. The entry you selected will be copied to the Dial Out Display area.
CClick on the [Dial] to begin the dialing sequence (see more information below).
Clipboard
Click on the [ Load from Clipboard] button and the contents of the Windows’clipboard are put into the Dial Out Display area.
If the Auto Filter option is checked CallClerk will automatically filter out non-dialable characters from the clipboard when it loads the Dial Out Display area.
The default value for 'Auto Filter' is set from the Settings– Dial Outwindow.
You may additionally update the number to be dialed in the Dial Out Display area prior to beginning the dialing sequence.
Click on the [Dial] to begin the dialing sequence (see more information below).
Dial Pad
Click on any of the Dial Pad buttons and the Dial Out Display area will be updated accordingly.
The [Pause] button will insert a 'comma' into the Dial Out Display area. A common will cause your modem to pause when dialing - usually for about two or three seconds.
Click on the [Dial] to begin the dialing sequence (see more information below).
After you have hung-up, if you have dialed a number for which thier is no directory name you will be prompted to enter one - doing so is optional.
Keyboard
Click on the Dial Out Display area and you may update the number to be dialed directly.
In addition to the digits 0 through 9, many modems support the following special characters to control the dialing sequence:
a comma "," (without the quotes) - for a Pause of usually 2 or 3 seconds,
a capital letter "W" (without the quotes) - to wait for a dial tone,
(Note: to enter a "W" the Dial Out Edit Rules must be off)
an "@" symbol (without the quotes) -to wait for silence, and
a explanation mark "!" (without the quotes) - to cause a hook flash.
When you have finished updating the Dial Out Display area click on the [Dial] to begin the dialing sequence (see more information below).
Dialing Sequence (as reference above)
Click the [Dial] button to dial the number in the Dial Out Display Area.
When the [Dial] button is clicked the modem will place the outgoing call, also
the [Dial] button will change into a pale yellow [Pick-up] button and the Dial Pad buttons will turn pale yellow.
Click the Dial Pad buttons to dial additional digits after the call has been placed;
this is handy when you are calling a business and a machine asks you to press a number, or dial an extension number, to continue.
Click the [Pick-up] button when you are finished dialing and have picked up your phone’s handset.
Speaker phone
Requires a TAPI modem with speaker phone capabilities.
You can set speaker and mic volume and gain levels, as well as mute them through these controls.
Notes:
1. If you are using the speaker phone function, CallClerk will only activate the speak volume after it has completely finished dialing.
2. To prevent windows from activating the speaker volume before CallClerk has finished dialing click on:
Start- Windows - Settings - Control Panel - Phone and Modem Options - Modems (tab) - Click on your modem - Properties - Modem - Speaker Volume
and make sure the slider is all the way to the left (off) and then click ok - ok.
3. You can set CallClerk to automatically turn the speaker phone on when dialing or answering a call using the CallClerk - Settings - Speaker Phone window.
Music on Hold
Requires a TAPI Modem with speaker phone capabilities.
Plays the wav files found in the CallClerk's music directory when the Music On Hold button is ON.
Notes:
1. The location of CallClerk's music directory is detailed near the beginning of the CallClerk - Session Logbut in most cases will be either:
C:\Documents and Settings\All Users\Application Data\CallClerk\Music\
or
C:\WINDOWS\All Users\Application Data\CallClerk\Music\
2. The wav file that comes with CallClerk can be replace by one or more wav files, however the file properties of each wav file should be as follows:
audio format: PCM
audio sample rate: 8.000 kHz
audio sample size: 16 Bits
channels: 1 (Mono)
For versions of Windows Prior to and including Vista
Microsoft Windows' Sound Recorder program may be used change the properties of a wav file, to do this:
a) this Start Microsoft Windows' SoundRecorder
Start - Programs - Accessories - Entertainment - Sound Recorder
b) open a wav file - File - Open
c) select File - Save As
beside Format, click the [Change] button and select the options outlined above
d) give the file a name (it should end in with a .wav extension) and select OK
e) copy the file you created to the CallClerk music directory
For versions of Windows after Vista
Power Sound Editor Free is a great tool that can save your wav files in the needed format
3. Wav files are played in a continuous loop one after another when the Music On Hold button is ON.
4. When the Music On Hold button is ON the Speaker Phone Speaker and Mic are automatically turned OFF.
Recording a conversation
Requires a TAPI voice modem.
After you have dialed or answered a call a [Record] button will appear in the Dial Out window.
Click the [Record] button to record the phone conversation.
When you click the [Record] button it turns red and is renamed 'Recording'.
Click the red [Recording] button to stop recording.
Recordings accessed through the CallClerk History window.
If you would like to begin a recording automatically when a call is answered by clicking the [Answer] button on the CallClerk Display then the 'Automatically record calls answered by CallClerk' option on the CallClerk - Settings - Recording window should be checked.
You can record and stop recording multiple times during the same phone call.
Sending a Fax
Requires a TAPI modem
Click the [Send Fax] button to send a fax
You will then be prompted to select a TIF file to send as a fax
( for more information on TIF files see Sending and Receiving Faxes )
You may also select a JPG or BMP file to be faxed.
Following this the Forward via Fax window will appear.
Translating Key Pad Letters to Numbers
CallClerk applies the international standard for translating letters to numbers:
1 2 3 4 5 6 7 8 9 0
ABC DEF GHI JKL MNO PQRS TUV WXYZ
Misc.
In the case where you have answered a call from an 'Unfamiliar' caller, the Dial Pad window will also show a [Block] button; click this if you would like to block the call after answering it. You will be prompted to confirm this action, and if you say yes you will be prompted to let CallClerk know if you would like to block all calls from this number into the future.
Click the [Cancel] button to close the CallClerk – Dial Out window.
The CallClerk - Dial Out and Speed Dial windows looks like this: