CallClerk - Answering Machine
The CallClerk - Settings - Answering Machine window is used to control the CallClerk Answering Machine. High level options that can be set are:1. Number of Rings before answering machine picks up
2. If a greeting is to be played
3. If messages are to be recorded
4. If Remote Access it to be allowed
The number of Rings before CallClerk picks up the line is set at the top of the screen.
It will be the value for 'Number of rings before the answering machine picks up' plus the value for 'Extra rings when there are no unplayed message (Toll Saver)'
What is a Toll Saver? ... This is the number of additional rings that will be processed before the answering machine picks up when you have no new messages to listen to. The toll saver an old concept, used by people who used to pick up their messages via a long distance call from their answering machine. Basically, for example, with the answering machine set to pick up after 4 rings and the toll saver set to 2, when you call your number and there are message to listen to, your phone will ring 4 times before the answering machine kicks in, if however there are no messages to play your phone will ring 6 times before the answering machine kicked in. According if you hear 5 or 6 rings you know you have no messages and can hang up without incurring long distance charges.
You can also select to have the answering machine start as soon as possible after the Caller ID information is known. In most cases this will be just after the ring following when the caller id is transmitted. These options apply separately to Familiar, Unfamiliar, and Blocked callers. A similar option for a Custom Caller can be set on the Call Clerk - Directory Add/Edit window. This option overrides the Toll Saver feature described above..
Greetings
CallClerk comes with a default greeting which can be played, or if you like overridden by a default greeting you record yourself.
You can record your own default greeting by clicking on the [Record] button (it will turn to a red [Stop] button), speaking into a microphone connected to your sound card, and then clicking on the red [Stop] button to end your recording.
You can also import a pre-recorded .wav file. To do this click on the [Import] button, find the file and click on OK.
Also, for those who like to change their greeting files often - CallClerk will additionally look for files named:
"CallClerkGreetingFamiliar.wav"
"CallClerkGreetingUnFamiliar.wav"
"CallClerkGreetingBlocked.wav"
"CallClerkGreeting.wav"
If CallClerk finds this file (and it is in the correct audio format as described above) CallClerk will use this greeting as the default. Please note the CallClerkGreeting wav files should be in the following format:
audio format: PCM
audio sample rate: 8.000 kHz
audio sample size: 16 Bits
channels: 1 (Mono)
Aside from the default greeting, individual greetings by caller can be assigned via the CallClerk Directory - Add/Edit window.
In Summary, here is the pecking order CallClerk uses to determine which greeting will be played:
1. if available, an individual greeting as established for a specific caller via the CallClerk Directory - Add/Edit window will be played,
2. if item 1 above is not found, the file "CallClerkGreetingFamilliar.wav", "CallClerkGreetingUnFamilliar.wav", or "CallClerkGreetingBlocked.wav" (depending on the caller type) located in the same directory as your CallClerk settings are stored will be played,
3. if items 1 and 2 above are not found, the file "CallClerkGreeting.wav" file located in the same directory as your CallClerk settings are stored will be played,
4. if items 1 through 3 above are not found, the message you record by clicking on the [Record] button on the CallClerk - Settings - Answering Machine window, will be played
5. if items 1 through 4 above are not found CallClerk's preloaded default message will be played as the final alternative.
If a message is to be recorded you can optionally set a maximum time limit (in seconds) for the recorded message.
Note:
Some modems tell CallClerk when an call ends, others do not. If you have a modem that does not tell CallClerk when a call ends CallClerk may end up recording each message beyond the point when the caller hangs up. Although in a worse case this will ultimately be ended after the max time for recording a message is reached, CallClerk can also detect a long period of silence and use that as the signal to end the call. To turn the feature on or off you can click the button entitled 'End on Silence ON/OFF'. When you do this a new window will pop up. On this window you can check the option to end recording when silence is detected or not. You can also set the period of silence (in seconds). Additionally, as silence is a subjective thing, with some lines having to deal with static line noise, you can also set the threshold for silence (as a percentage of the maximum volume). Clicking the default button on this screen provides a standard set of settings that work in many cases.
To provide you with a notification that you have received a Recorded Message, CallClerk can flash your Keyboard's Caps Lock light, Num Lock light and/or Scroll Lock light. It can also cause your PC to repeatedly beep if you like. To stop one of the keyboard lights from flashing simply press the associated key. For example if you have set CallClerk up to flash the Caps Lock light when you receive a fax, simply press the Caps Lock key to stop the flashing. If you have selected the repeating beep option, you can stop the beeping by pressing the Scroll Lock key. If you don't press one of the keys to stop the flashing/beeping CallClerk will continue the flashing/beeping until you have viewed all unreviewed messages in the CallClerk History window.
Please note: similar options can be set on the CallClerk - Settings - Fax window for messages
Remote Access to Messages
If Remote Access to Messages is enabled you must enter a remote access code.
Remote access codes must be numeric and cannot start with:
| '0' | a zero is used to stop the answering machine if it is playing a greeting / recording a message - for example when you pick up the line and the answering machine is in the process of recording a message from someone and you want to talk to them. |
| '99' | a '99' is used to block a call when the answering machine is active. |
To access your messages remotely you dial your phone line and enter your remote access code on a touch tone dial pad.
After you have done this commands that you can use are:
1 to listen to your unplayed messages
2 to listen to all messages
3 to listen to all messages and review calls with no messages
4 to go back one message
5 to restart current message
6 to go forward one message
7 to Hang-Up
0 to stop all playing and recording
* to change your default greeting
# to repeat these commands
CallClerk will also recap the date, time, name and number associated with all calls prior to playing their associated messages (if any) for you.
After every 5th reported call you will be asked if you are still there and to press 9 to continue. If you don't press 9 you will be asked a second time. If you do not press 9 CallClerk will hang up the call. This is done as some modems do not effectively report the caller has hung up on the other end. It prevents CallClerk from holding your line open replaying all your messages even after the remote caller has hung up.
You can further restrict remote access to your messages by listing phone numbers (as identified in terms of their callerid number) in a list of numbers that CallClerk will only allow access to your messages from. Multiple numbers are separated by a semi-colon (;), with a semi-colon also following the last number. To access your messages from any phone, leave the restricted list empty.
Other Notes
1. If CalClerk's answering machine picks up a call and you later pick up the phone you can press "0" (zero) on your phone's keypad to stop all playing and recording.
2. To receive a fax you can have the caller press "*" on their phone's dialpad to put CallClerk in fax receive mode. If you would like to let people know they can do this you can change your default answering greeting to instruct them to do so if they so wish.
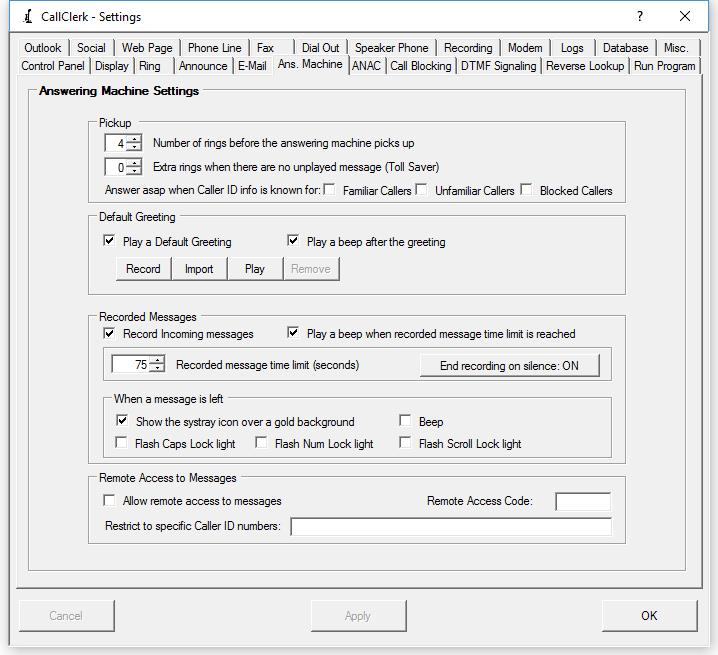
The CallClerk - Settings - Answering Machine window looks like this: